
Let’s get down to business.

Thanksgiving is here, and it’s time to get serious about food. Whether you’re hosting the meal, bringing a side dish, baking dessert, or mixing cocktails, you will benefit from the information that follows.
I hosted a trial Thanksgiving at my apartment earlier this month so I could test some new recipes and figure out the oven schedule for 10+ dishes in one day. Below you will find my top Thanksgiving prep tips and my favorite Thanksgiving recipes.
DISTRICTFOOD’S THANKSGIVING TIPS
Tip #1 – Figure out what you can make in advance.
There is absolutely no reason for you to make every dish on Thursday. Cranberry sauce will keep for a solid week, as will pies and crumbles. Spread it out over a few days and your sanity will thank you.
Tip #2 – You need about 3x as much butter as you think you do.
It’s not just the mashed potatoes that are greedy for butter. The turkey demands one pound of butter all by itself. Not only will you be stuffing herbed butter under the skin, you’ll also need to melt at least two sticks to soak the cheese cloth that will cover the bird. If you’re in charge of dessert, we’re talking about another few sticks. Just buy 3-5 lbs of butter and thank me later.
Tip #3 – Before the big day, decide which serving dish will hold which part of the meal.
For all you twenty-somethings out there who live in a tiny apartment like me, you probably do not have an abundance of space for casserole dishes or serving plates. Once you have your menu finalized, go through your kitchen and make sure you have enough dishes to cook and serve everything.
Tip #4 – Make a schedule for Thanksgiving day, including time for you to shower and get ready.
Decide what time you’re serving dinner and work backwards from there. Remember that the turkey should sit for ~30 minutes after it comes out. I know it sounds silly, but it is crucial to figure out when you’ll have time to shower. I don’t shower first thing in the morning because I’ll be covered in flour, sweat, wine, and bread crumbs by 3:00 PM. The ideal time is before guests arrive and after you’ve put the turkey in the oven. You don’t need to be completely done, but preferably all that will be left at that point will be stove top dishes or no-cook sides.
Tip #5 – Make at least one dish in the slow cooker.
If you own a slow cooker, definitely use it on this chaotic day. It’s one less thing you need to fit in the oven, and you won’t have to constantly monitor it while everything else is cooking. I chose to make my stuffing in the crockpot, but there are other great options, like Half Baked Harvest’s slow cooker three cheese mashed potatoes.
Tip #6 – Don’t get too drunk before you need to make the gravy.
Gravy requires concentration. Four glasses of wine will impair that concentration. Don’t ask me how I know.
DISTRICTFOOD’S THANKSGIVING MENU
My Thanksgiving menu choices came from all over – magazines, cook books, family recipes, and my favorite food blogs. Special thanks to Half Baked Harvest, Pioneer Woman, and Skinny Taste for being damn creative with food and sharing their brilliance with the internet.
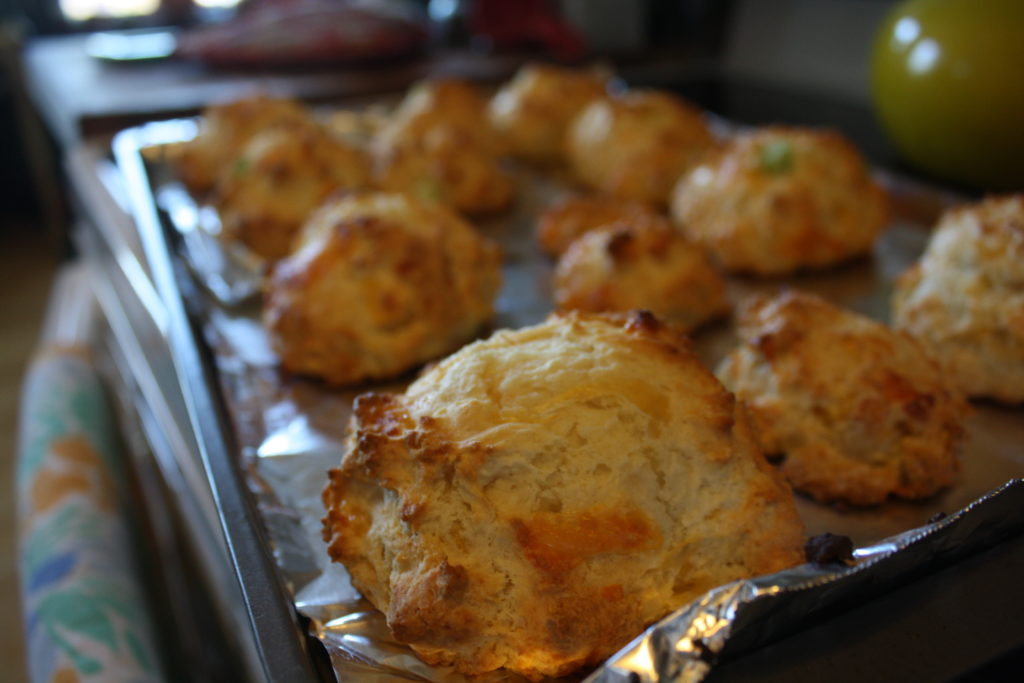
RECIPE #1 – Cheddar Scallion Biscuits
Servings: 10 biscuits | Prep Time: 20 minutes | Cook Time: 7 minutes
My family always did the traditional dinner roll thing at Thanksgiving, but I wanted to make the carbs a little more interesting. These were hands down the most popular item at my practice Thanksgiving. Ironically, they were the easiest thing to make.
Ingredients
- 2 cups all-purpose flour
- 3/4 teaspoon of salt (you can always add more)
- 3 teaspoons baking powder
- 1 teaspoon baking soda
- 2 tablespoons sugar
- 5 tablespoons cold butter, cut into very small bits
- 1 cup plain yogurt
- 1/3 cup scallions, chopped
- 2/3 cup sharp cheddar cheese, shredded
Directions
- Preheat oven to 450°F.
- Add flour, salt, baking powder, baking soda and sugar to a food processor and pulse until well mixed.
- Add the bits of butter to the food processor and pulse a few more times until well mixed. The consistency should be almost like cornmeal.
- Transfer the contents of the food processor to a bowl. Use a spoon to mix in the yogurt until the mixture can form a ball.
- Fold in the cheddar cheese and chopped scallions.
- Use your hands to form the dough into balls that are about the size of your palm and 3/4 of an inch thick. You can adjust these measurements depending on how big/small you want your biscuits to be.
- Place the biscuits on a buttered baking sheet and bake for 7 minutes. Remove them from the pan. I made these early in the day, so I placed a cotton napkin in a basket, added the biscuits and covered them with another napkin. When it’s time to serve, pop them in a warm oven for 5 minutes to heat them back up.

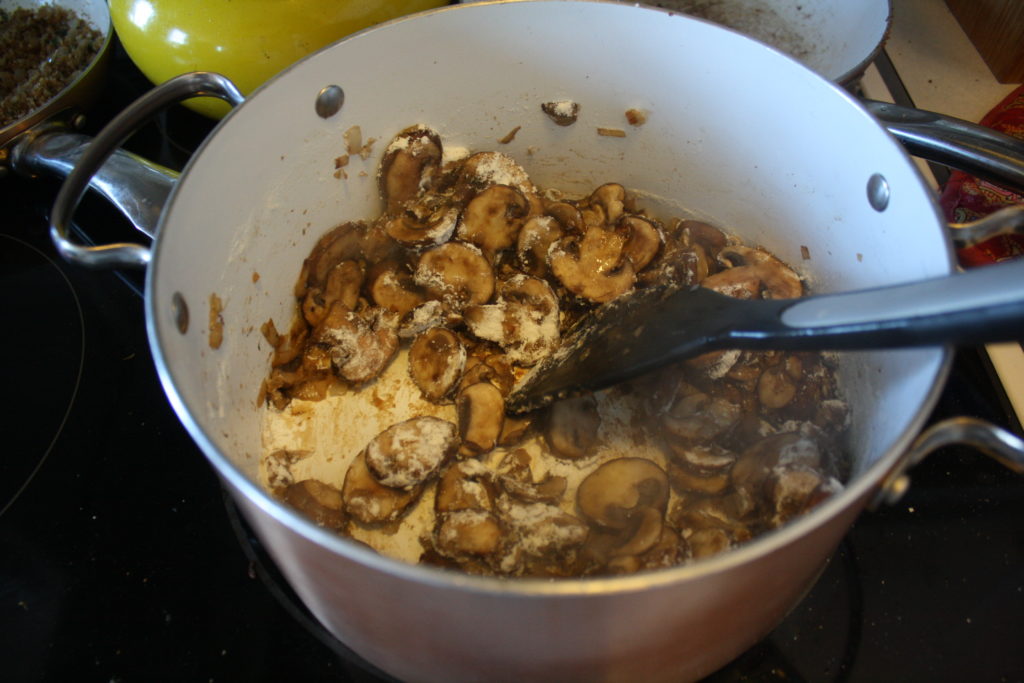
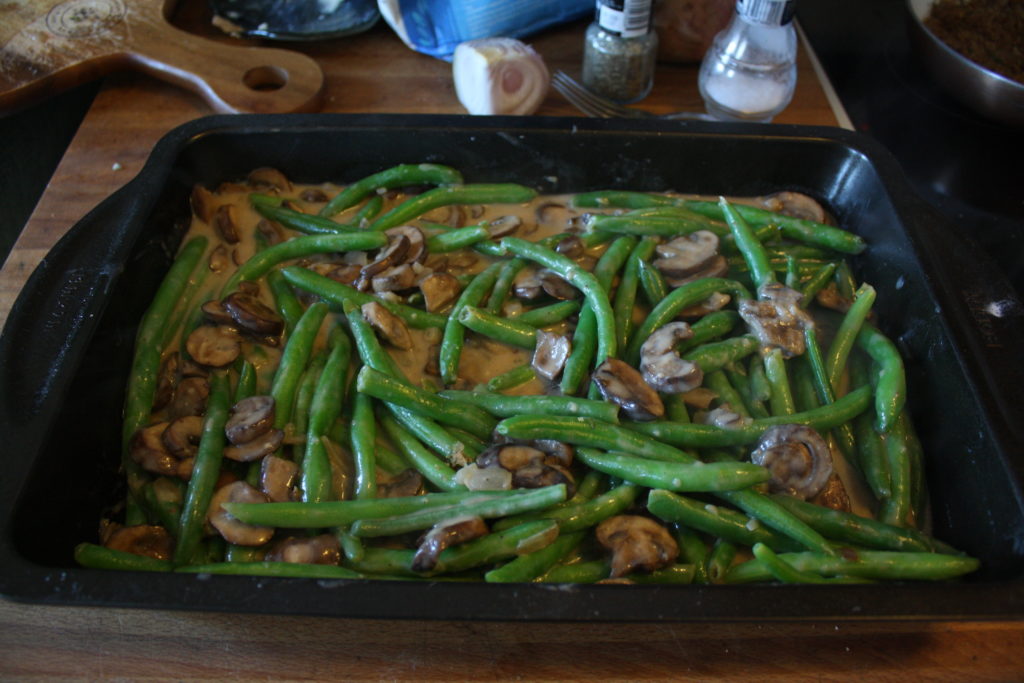
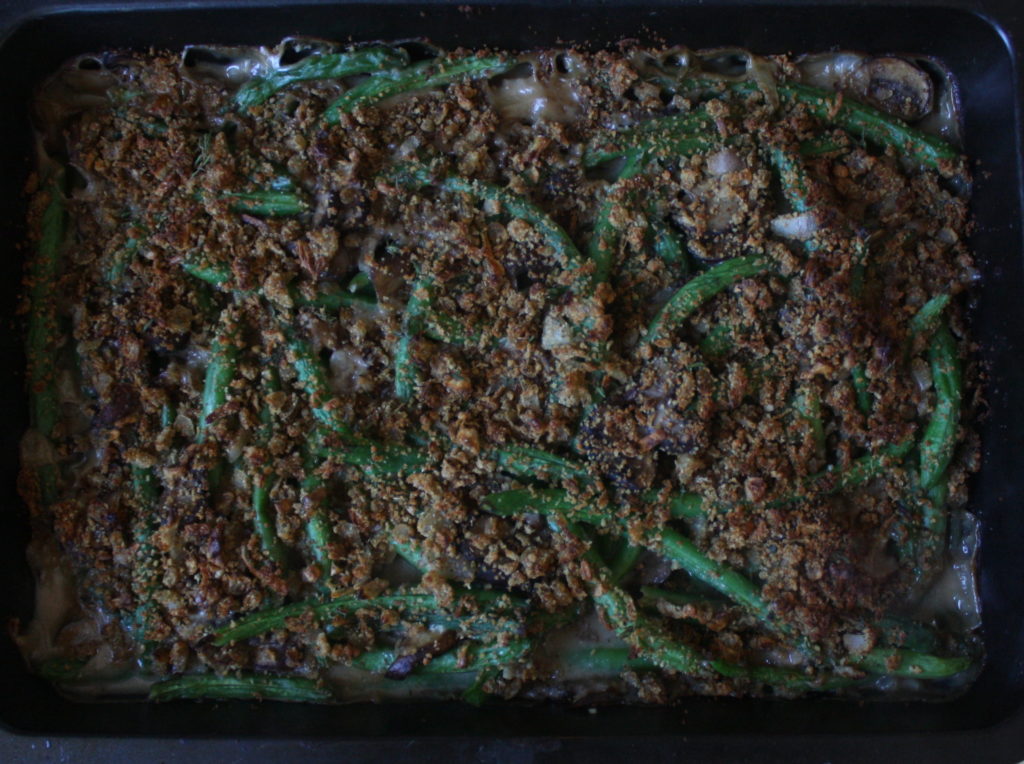
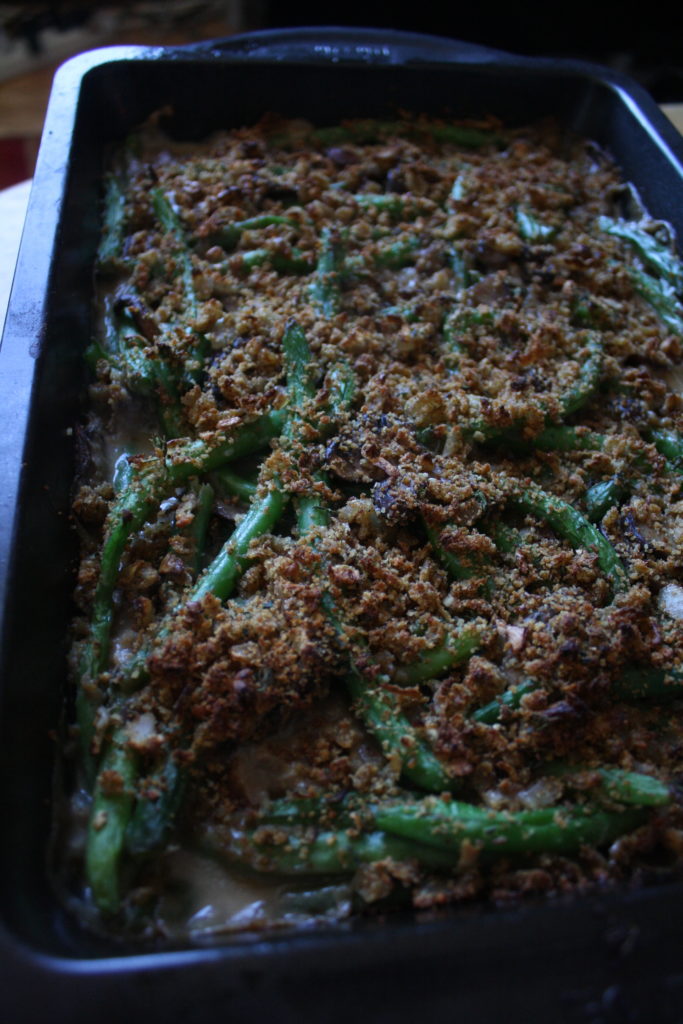
RECIPE #2 – Green Bean Casserole With Crispy Shallot Topping
Servings: 8 | Prep Time: 70 minutes | Cook Time: 30 minutes
This is adapted from Skinny Taste’s recipe and I am obsessed with it. I used Lactaid milk instead of 1% milk and no one could taste the difference. All the creaminess of the casserole without the bloating and lethargy!
Topping Ingredients
- 1 tbsp olive oil
- 1&1/2 cup shallots, finely diced
- 2/3 cup garlic and herb seasoned bread crumbs
- 1 tbsp grated Romano or Parmesan cheese
- 1/2 tsp dried thyme (or 1 tsp fresh)
Green Bean Ingredients
- 2 lbs green beans, cut in half, trimmed and washed
- 1 tbsp olive oil
- 1/3 cup shallots, minced
- 16 oz sliced cremini mushrooms
- 1/4 cup flour
- 1 cup reduced sodium chicken broth
- 1 cup Lactaid Fat Free milk
- 1/3 cup parmesan cheese, grated
Directions
- Preheat oven to 375°F.
-
Bring a large pot of water to a boil. Add green beans and blanch for 2 minutes. Drain in a colander and rinse under cold water to stop them from cooking. Set aside.
-
Heat a medium-sized skillet over medium heat. Add the shallots and sauté 3-5 minutes, stirring occasionally until golden brown. Reduce heat to medium-low, add breadcrumbs, grated cheese and thyme; sauté until golden brown, about 5-6 minutes, stirring frequently, careful not to burn. Turn off heat and set aside.
-
Lightly spray a 13 x 9 inch baking dish.
-
In another large sauté pan, heat oil over medium-high heat. Add the 1/3 cup of shallots and sauté 1-2 minutes. Add mushrooms, season with salt and pepper and sauté 6-8 minutes, stirring occasionally.
-
Sprinkle flour over the mushrooms, stir constantly for about a minute, then slowly add chicken stock and milk. Bring to a low boil, and stir occasionally until thickened, about 3 minutes. Stir in Romano cheese.
-
Add blanched green beens and mix well. Season with salt and pepper. Pour into prepared baking dish.
-
Top with toasted bread crumbs and bake for 30 minutes.

RECIPE #3 – Slow Cooker Sausage Stuffing
Servings: 6 | Prep Time: 2 hours* | Cook Time: 4-5 hours
*Less, if you buy pre-dried bread pieces
Sorry to burst everyone’s bubble, but here’s the ugly truth: we need to stop cooking stuffing inside the cavity of the turkey. Better Homes and Gardens consulted numerous professional chefs for their most recent Thanksgiving issue and they all agreed that the only way to cook turkey stuffing to a “safe” temperature is to simultaneously overcook the bird. Here’s a crockpot stuffing that won’t give anyone salmonella.
Adapted from The Chic Site recipe.
Ingredients
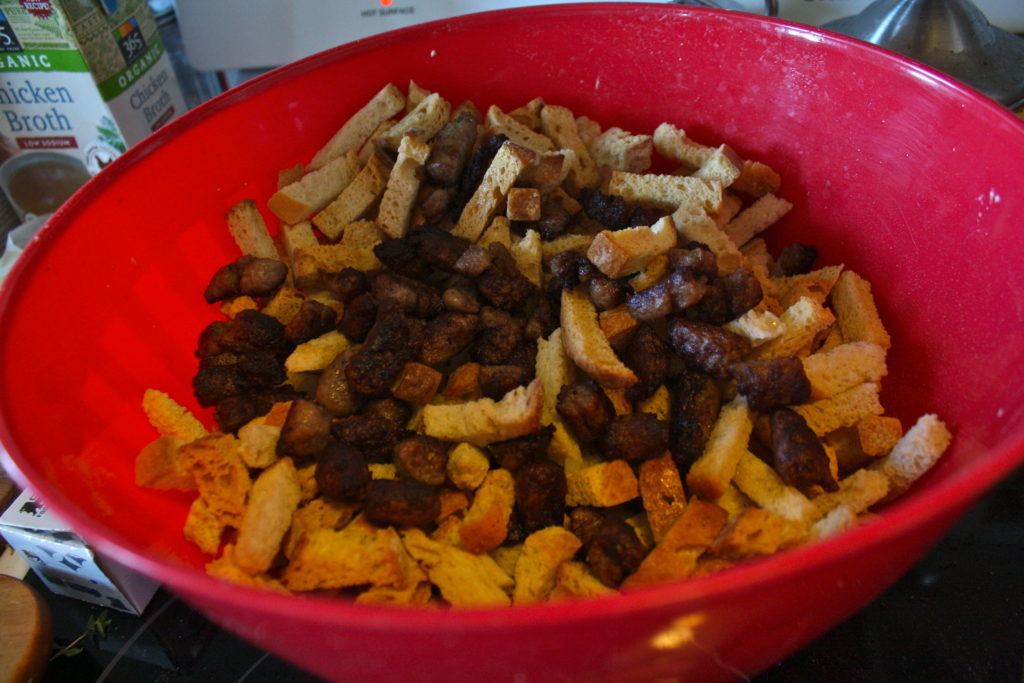
- 1 pound crusty bread, cut into bite-sized cubes (I buy pre-dried stuffing bread pieces from Whole Foods)
- 12-16 oz breakfast sausage, removed from the casing
- 3 Tbsp unsalted butter
- 1 medium onion, chopped (about 2 cups)
- 3/4 cups celery, chopped
- 1 Tbsp fresh thyme, chopped (or 1 tsp dried thyme)
- 1 Tbsp fresh sage, chopped (or 1 tsp dried sage)
- 2 cups reduced (low) sodium chicken broth
- 1 large egg
- 1/2 tsp kosher salt
- 3/4 tsp black pepper
- (optional) chopped chives, thyme, and sage for garnish
Directions
- (skip this step if you buy the pre-dried bread from Whole Foods) Preheat oven to 300 degrees F. Place cut bread on a baking sheet. Bake for 25-30 minutes until bread is stale and dried out. Toss bread midway through baking to ensure even cooking. Alternatively, cut bread ahead of time and leave out on counter for a day or two to dry out.
- Place bread in a large bowl. Set aside. Grab a long piece of foil. Fold it a couple of time over itself to create a band. Line the sides of the slow cooker pot with the foil. Lightly coat with nonstick spray.
- In a large skillet, heat 1 TBSP of oil. Add breakfast sausage. Cook until sausage is brown and cooked throughout. As sausage is cooking, break into small chunks using a wooden spoon.
- Drain cooked sausage and add to the bowl with the bread. Keep all the browned bits in the pan.
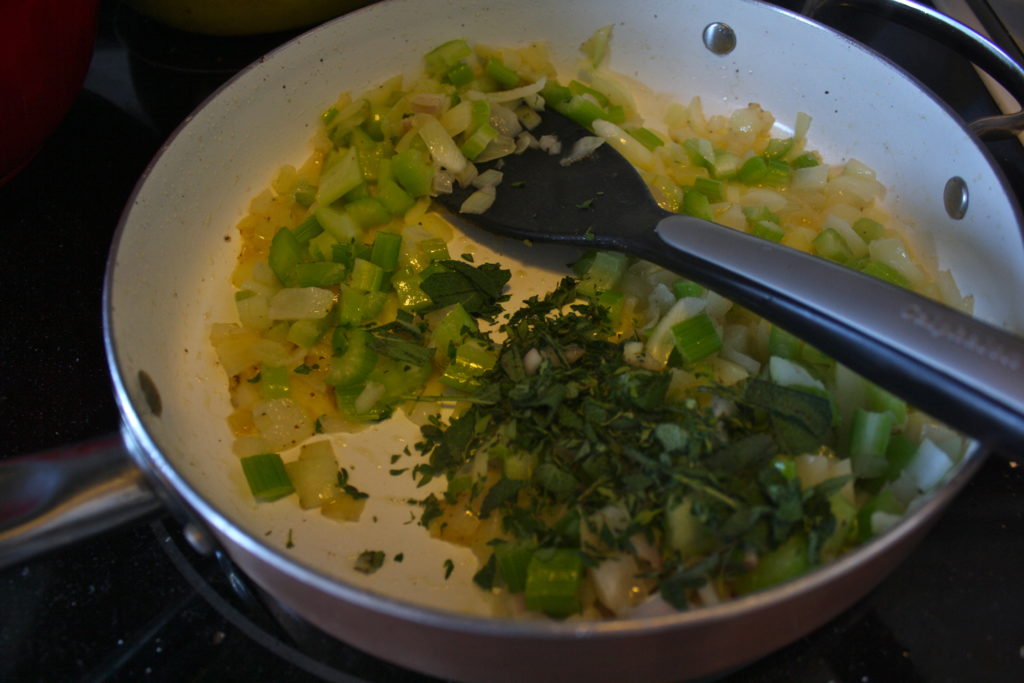
- Using the same pan you cooked sausage in, add butter and set over medium heat. Once butter has melted, add onions and celery. Cook until onions have softened.
- Add chopped thyme and sage. Toss to combine and cook until herbs are aromatic.
- Add about 1/2 cup of the 2 cups of chicken broth. Use a wooden spoon to scrape up any of the browned bits of sausage on the bottom of the pan. Cook until broth comes to a boil. Remove from heat and pour mixture on top of bread-sausage mixture.
- In another bowl, whisk together remaining chicken broth, egg, and salt and pepper. Pour over bread mixture and gently toss to combine. Make sure all the bread pieces are coated.
- Transfer mixture to prepared slow cooker pot. Cover and cook for 4-5 hours on low setting. Make sure mixture has reached temperature of at least 165 degrees F to ensure egg is cooked. Turn off slow cooker and remove foil. Transfer stuffing to serving dish. Garnish with additional herbs.
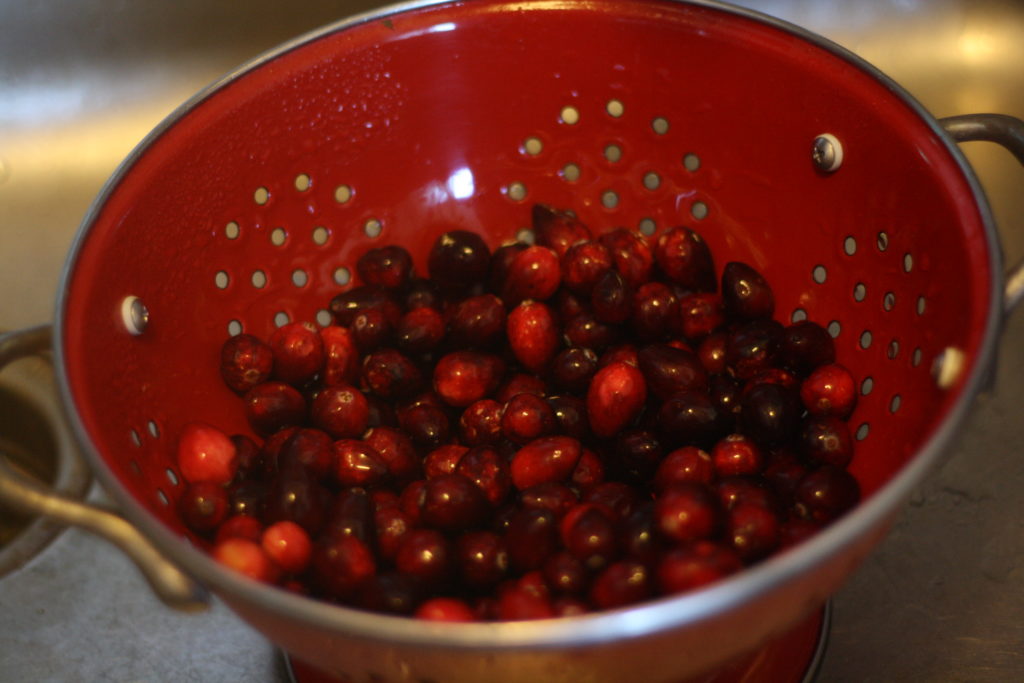
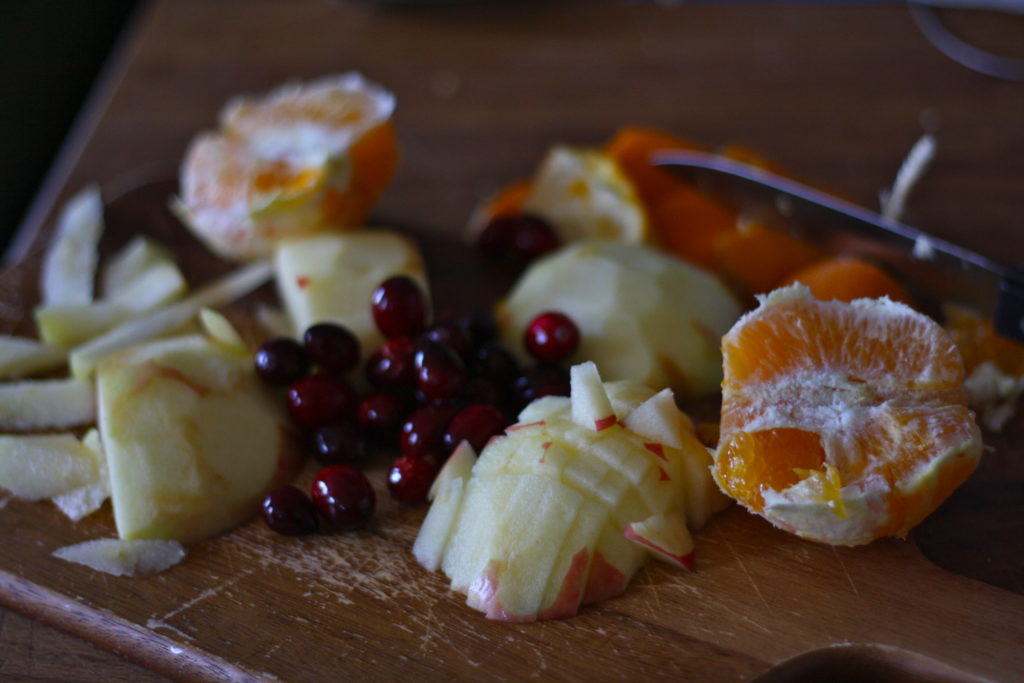
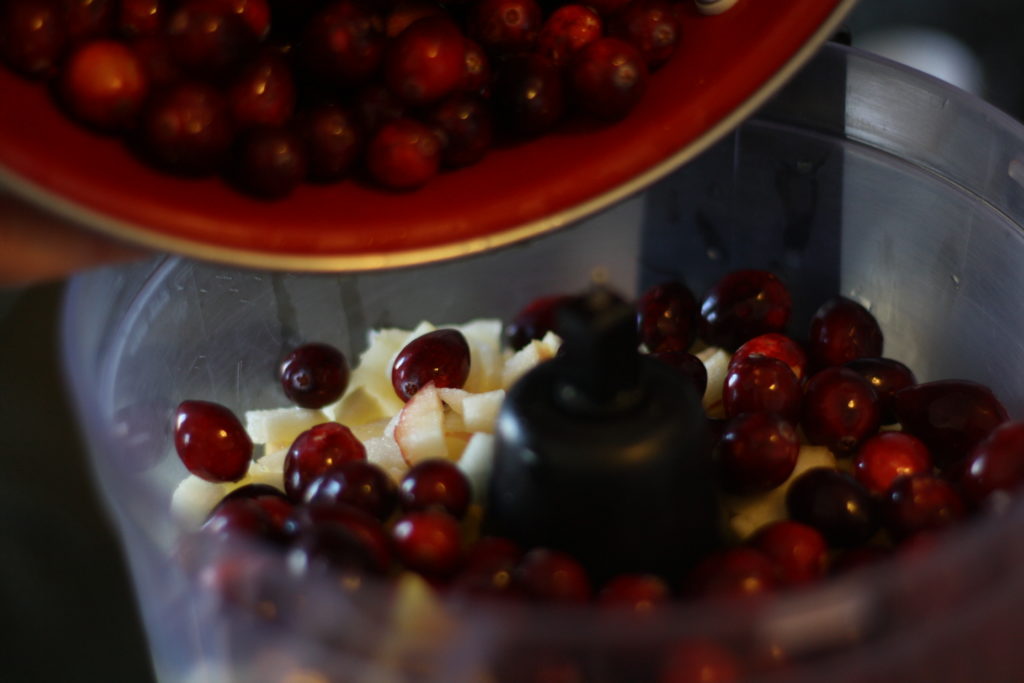
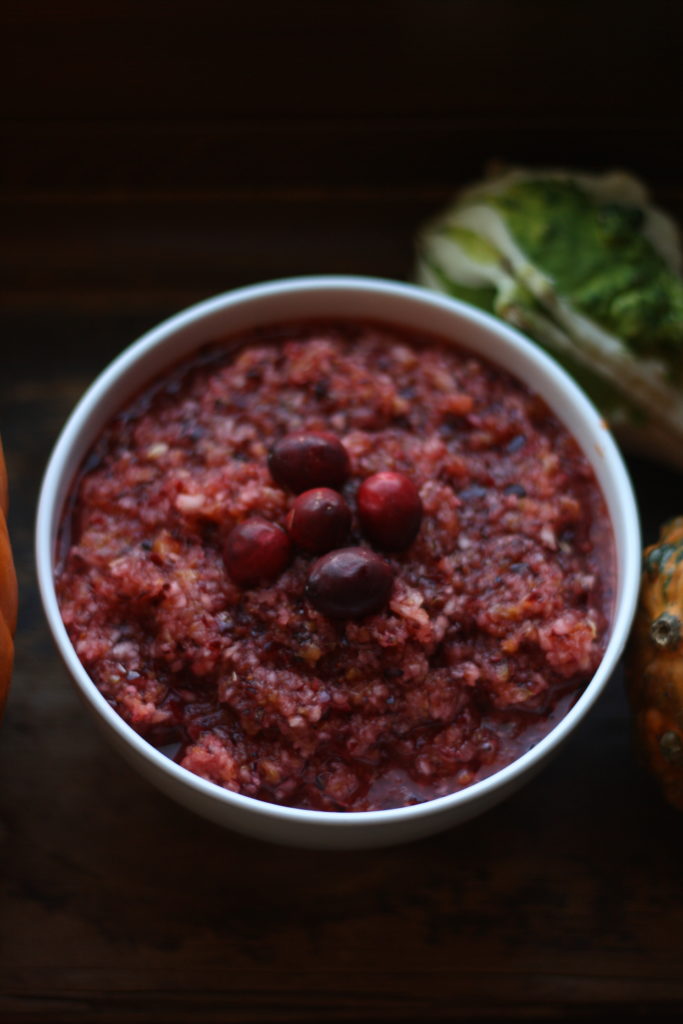
RECIPE #4 – Cranberry Orange Relish
Servings: 10-12 | Prep time: 15 minutes
Recipe from Better Homes & Gardens. This is a fast, easy cranberry relish that’s pleasantly tart with a sprinkle of sweetness.
Ingredients
- 1 orange
- 12 oz package cranberries (thawed, if frozen)
- 1 apple (preferably Gala, Fiji or Red Delicious), cored, peeled and chopped
- 1/4 cup sugar
- 1/4 tsp ground allspice
Directions
- Cut the peel and white pith from the orange; cut orange segments free from the membrane and discard any seeds.
- In a food processor, pulse orange, cranberries, apple, sugar and the allspice until coarsely chopped. Transfer to a bowl. Cover and chill up to one week.
RECIPE #5 – Roasted Garlic & Chive Mashed Potatoes
Servings: 10 | Prep Time: 1 hour | Cook Time: 30 minutes
Boy, was this a best seller. I adapted these mashed potatoes from the Pioneer Woman’s recipe, but I jazzed it up a little with roasted garlic and chives. There were no leftovers.
Ingredients
- 5 pounds Russet or Yukon Gold potatoes
- 3/4 cups butter
- 1 package (8 oz) cream cheese, softened
- 1/2 cup (to 3/4 Cups) Lactaid milk (or half & half)
- 1/2 teaspoon salt
- 1/2 teaspoon black pepper
- 1 full head of garlic
- 1/2-2/3 cup scallions, chopped
Directions
- Peel and cut the potatoes into pieces that are generally the same size. Bring a large pot of water to a simmer and add the potatoes. Bring to a boil and cook for 30 to 35 minutes. When they’re cooked through, the fork should easily slide into the potatoes with no resistance, and the potatoes should almost, but not totally, fall apart.
- While the potatoes are cooking, slice off the tops of the garlic head. Drizzle with olive oil and wrap completely in tin foil. Roast in the oven or toaster oven at 450 degrees F until very soft, about 15-20 minutes. Set aside.
- Drain the potatoes in a large colander. When the potatoes have finished draining, place them back into the dry pot and put the pot on the stove. Mash the potatoes over low heat, allowing all the steam to escape, before adding in all the other ingredients.
- Turn off the stove and add butter, cream cheese and milk. Mash well.
- Add salt and pepper. Mix in roasted garlic and scallions.
- (optional) If you have an immersion blender, you can give the potatoes a few pulses to blend out any lumps.
- Transfer to serving dish and serve immediately.
Note: When making this dish a day or two in advance, take it out of the fridge about 2 to 3 hours before serving time. Bake in a 350-degree oven for about 20 to 30 minutes or until warmed through.
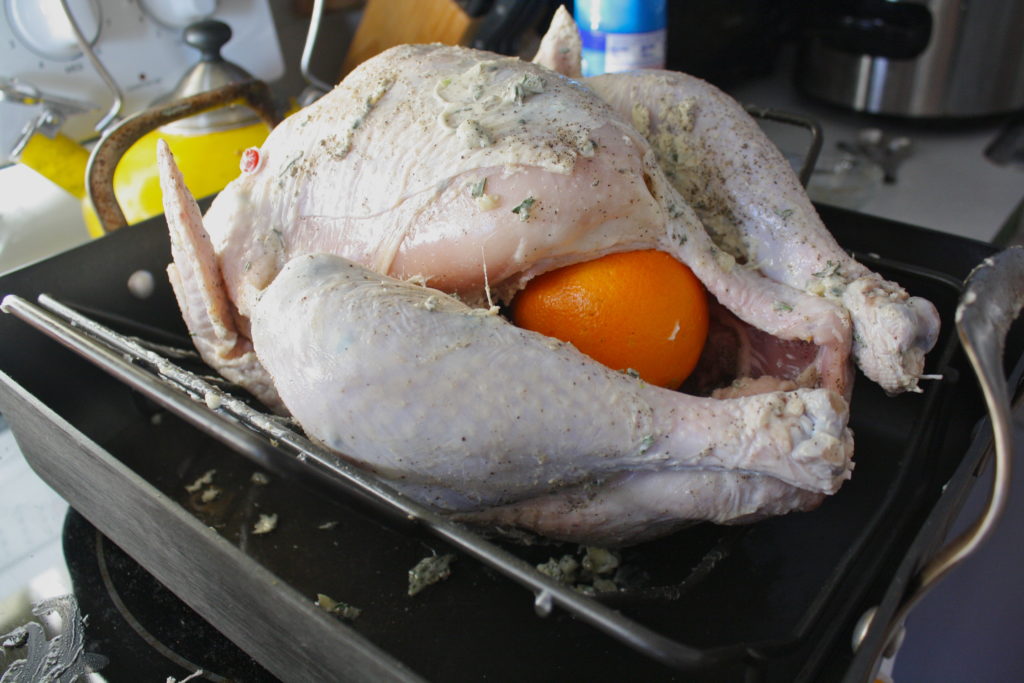
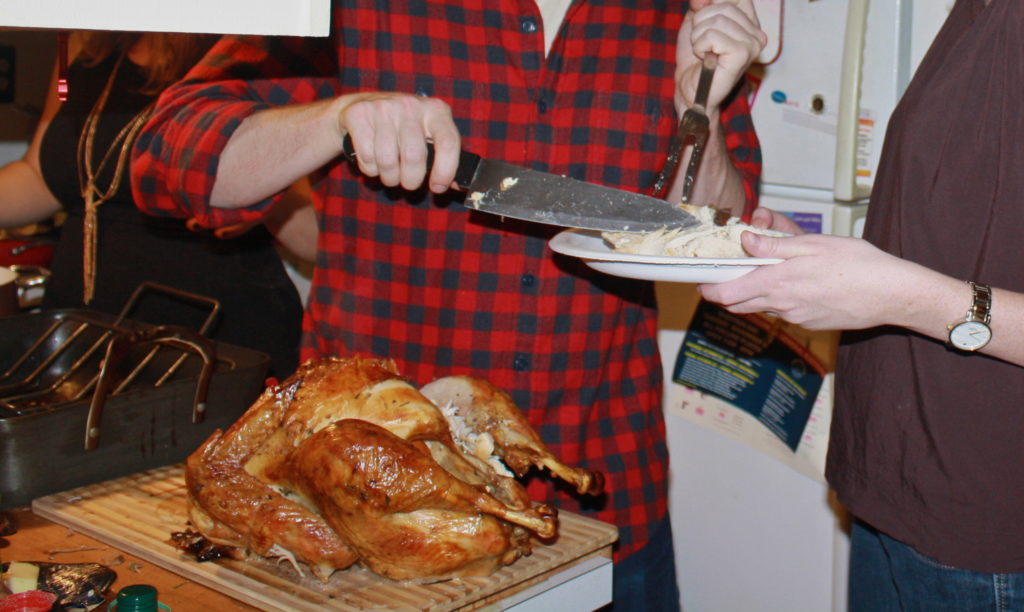
RECIPE #6 – Turkey and Pan Gravy
Servings: 10-12 | Prep Time: 25 minutes | Cook Time: 2 hours, plus 30 minutes for standing time
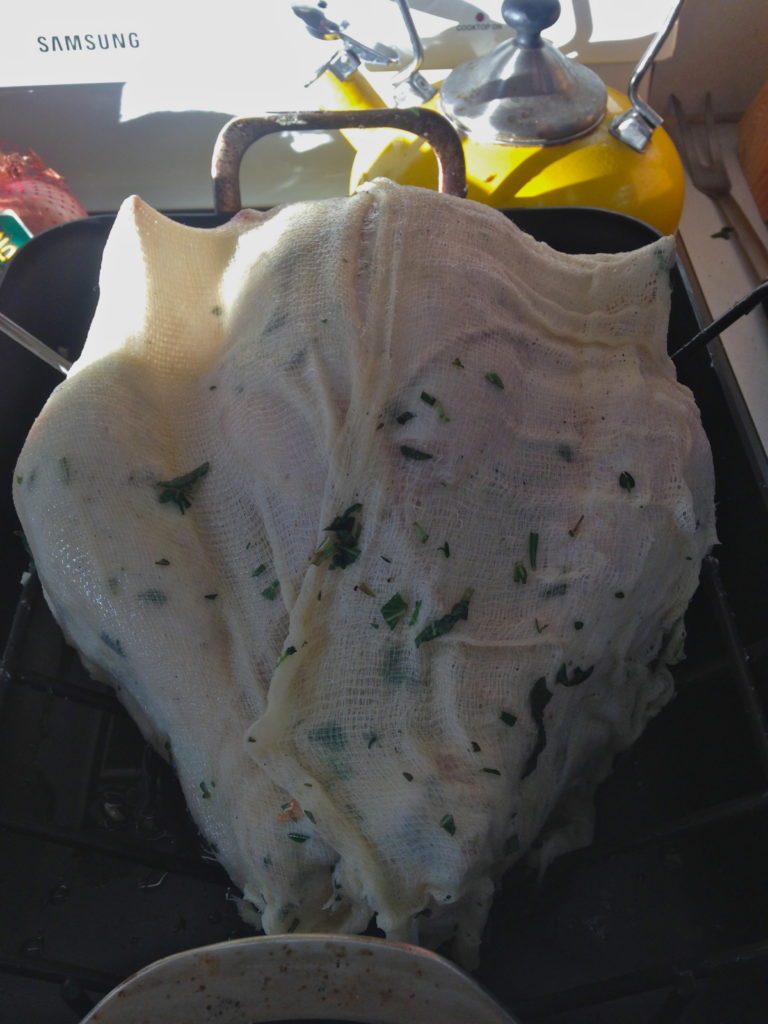
For my turkey recipe, I pulled ideas from two of the greats: Better Homes & Gardens and food blogger Half Baked Harvest (also known by her first name, Tieghan). Better Homes gave me the idea to do a “flash roasted” turkey (high heat, shorter cook time); Tieghan introduced me to the magic of the cheese cloth. I almost cried when it came out of the oven – it looked exactly how I pictured the perfect turkey in my dreams. The butter-and-herb soaked cheesecloth keeps the bird entirely basted during cook time – no manual basting required!
Ingredients
- 1 10-12 lb turkey (~1 to 1 1/2 lbs per person)
- 2 large garlic cloves, peeled
- 3/4 cup unsalted butter, softened and another 1/2 cup butter, melted
- 1/2 cup chopped fresh herbs (sage, thyme, rosemary), separated into 1/4 batches
- 5 TBSP all purpose flour
- 1 orange
- 1 cheesecloth
- salt and pepper to taste
Directions
- Preheat oven to 450 degrees F. Place rack in lower third of the oven.
- Mince garlic. In a small bowl, mash garlic with 1 tsp of salt to form a paste. Add butter, 1/4 cup of the herbs and 1/2 tsp black pepper.
- Remote neck and giblets from the turkey and set aside. Discard the liver.
- Wash and pat the turkey dry inside and out. Use your fingers to gently loosen the breast skin and leg skin. Massage the herbed butter mixture under the skin evenly, being careful not to tear it. Season the outside and inside of the turkey generously with salt and pepper.
- Pierce a whole orange all over with a fork and place inside the turkey cavity.
- Tuck wing tips under the breast and tie the drumsticks together with kitchen string.
- In a larger bowl, melt two sticks (1/2 cup) of butter and combine with the remaining 1/4 cup of the chopped herbs. Soak the cheesecloth in the mixture thoroughly. Drape over the top of the bird so it is covered. I needed two separate pieces.
- Place the bird on a rack inside a roasting pan and insert into the oven. Roasted for 2 hours, or until a meat thermometer reads at least 175 degrees F when inserted into the thigh.
- Remove and let stand for 30 minutes before carving.
- Gravy is challenging and terrifying, so I’m just going to direct you to Pioneer Woman’s recipe for pan gravy: click here for great gravy.

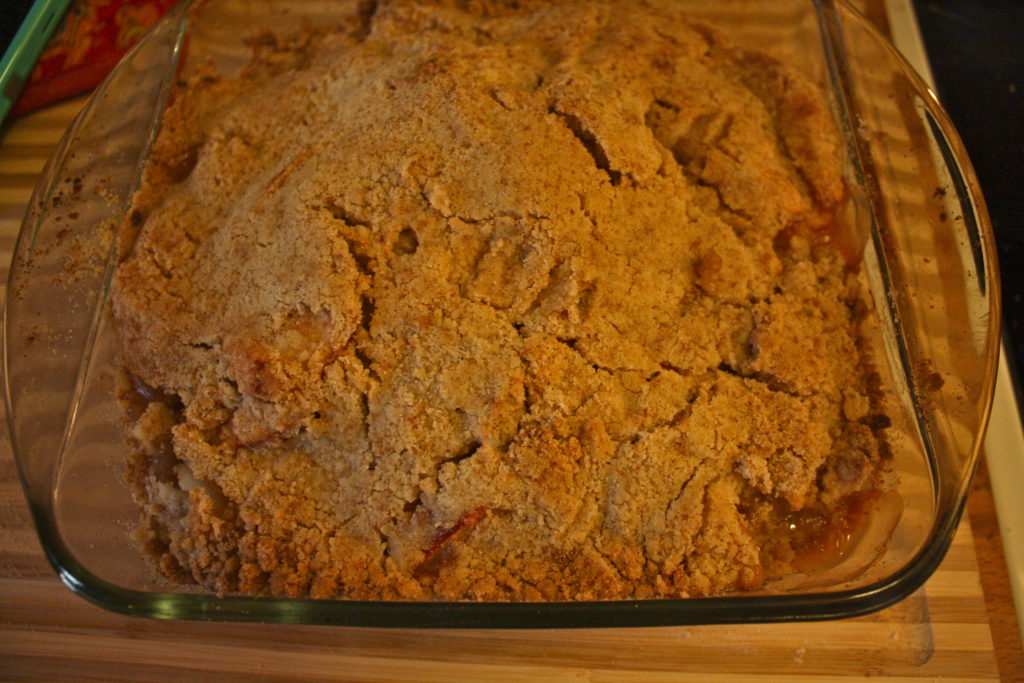
RECIPE #7 – Apple Crisp
Serves: 8-10 | Prep Time: 20 minutes | Cook Time: 1 hour, plus 15 minutes standing time
This is my favorite dessert in the fall and winter. Enough said. Serve with vanilla bean or ginger ice cream.
Ingredients
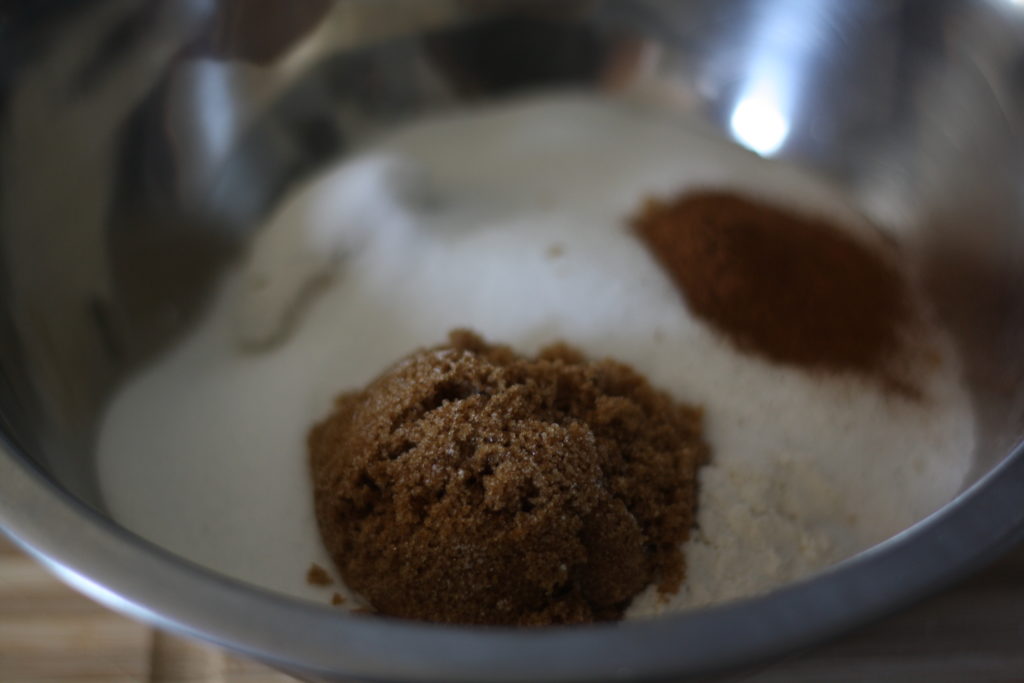
- 1&1/2 cup all-purpose flour
- 1 cup granulated sugar
- 1/3 cup packed brown sugar
- 3/4 tsp cinnamon
- 1/2 tsp salt
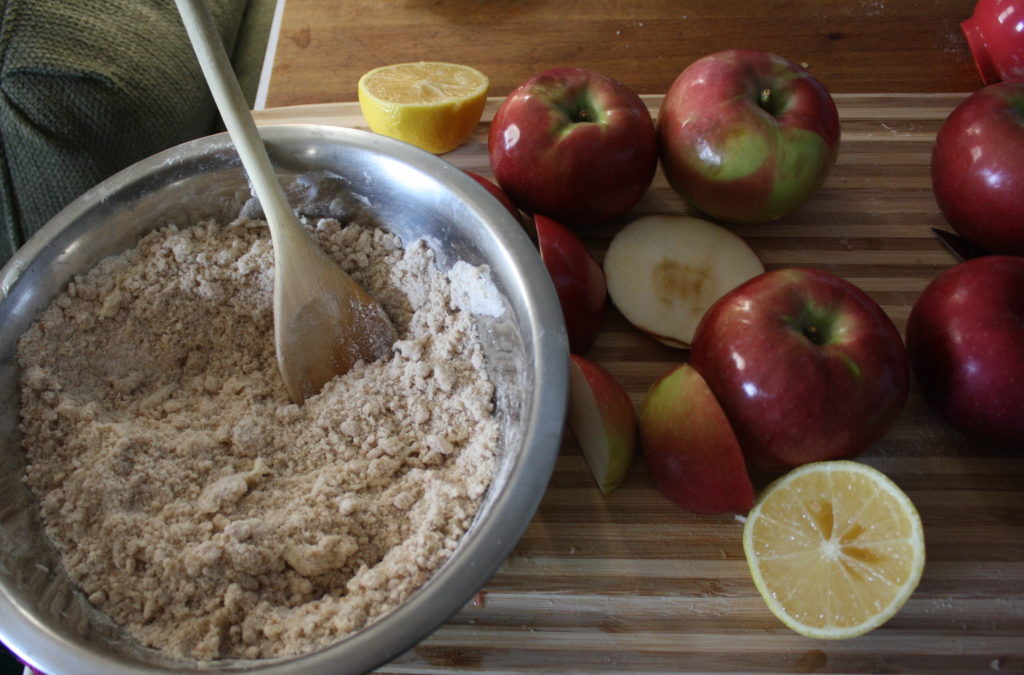
- 1&1/4 cup unsalted butter, softened, cut into pieces
- 8 cups peeled apples (~6-8 apples), sliced 1/2 inch thick
- 2 TBSP fresh lemon juice
- 1/4 cup granulated sugar
- 1 TBSP flour
- 1/2 tsp salt
- 1/4 tsp nutmeg
Directions
- Preheat oven to 375 degrees F.
- In a large bowl, combine 1 cup flour, 1 cup sugar, brown sugar, cinnamon, and 1/2 tsp salt. With your fingers, work butter into flour mixture until it just clings together.
- In a 4-quart bowl toss together apples and lemon juice. Don’t slice the apples too thin, or they’ll reduce to a sauce during baking.
- In a small bowl, combine 1/4 cup sugar, 1 tbsp flour, salt and nutmeg.
- Sprinkle apples with nutmeg mixture.
- Heap apples into a lightly buttered 2 quart baking dish. The apples will collapse during baking, so make sure to pile them above the rim of the baking dish.
- Cover top of the apples with the flour and butter mixture.
- Cover the top of the crisp with wax paper, then foil. Bake for 20 minutes.
- After 20 minutes, remove foil and paper and return to oven to bake for an additional 30-40 minutes. Let cool for 15 minutes.
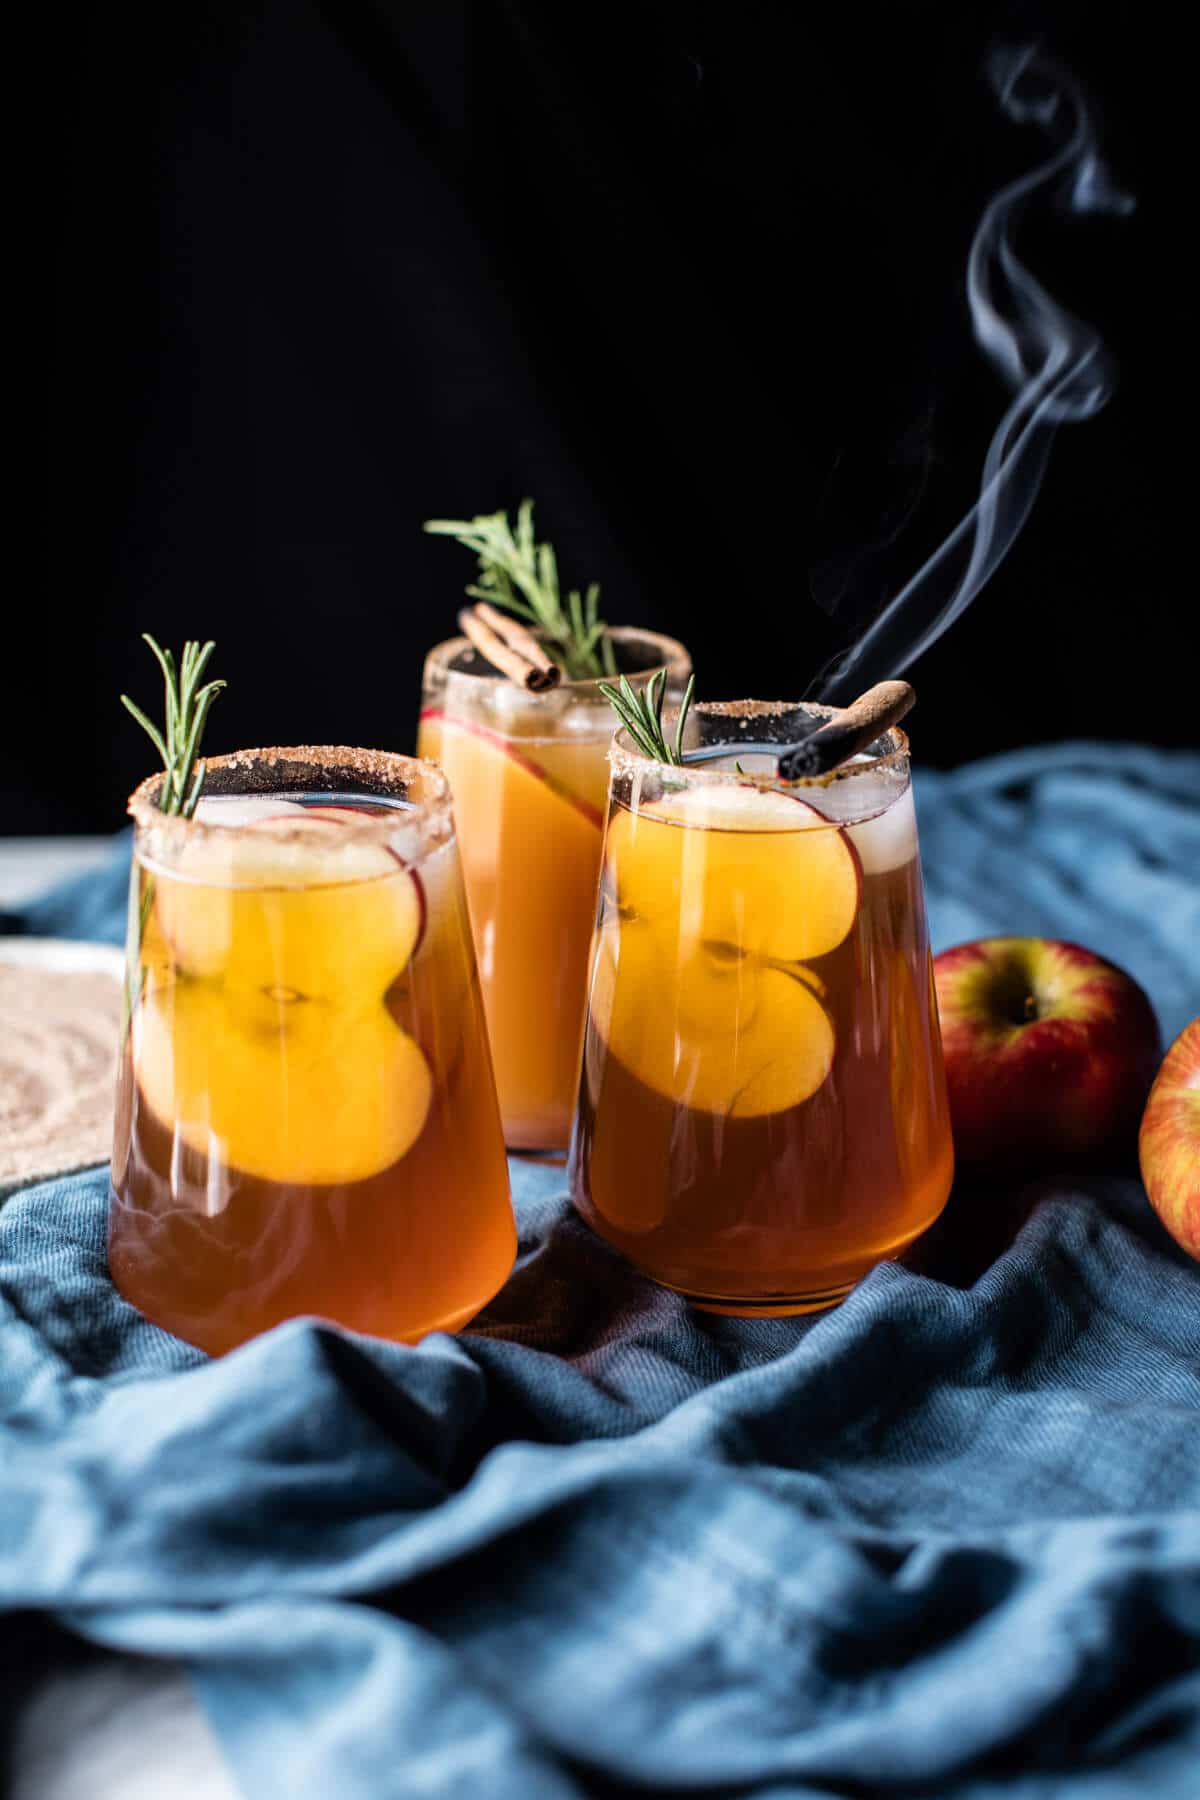
BONUS RECIPE #8 – Smoky Apple Cider Margaritas
Servings: 1 cocktail | Prep Time: 5 minutes
OK to be fair, I haven’t actually made these yet – but I’m going to on Thursday. I’ve had this recipe bookmarked ever since Half Baked Harvest posted it in October.
Ingredients
- 1 1/2 – 2 ounces mezcal or silver tequila
- 4 ounces (1/2 cup) apple cider
- 1 ounce fresh lime juice
- 1-2 teaspoons agave nectar, or more to taste
- cinnamon + granulated sugar + kosher salt, for the rim
- apple slices + cinnamon sticks, for serving
Big Batch Margaritas
- 1 cup (8 ounces) mezcal or silver tequila
- 2 cups (16 ounces) apple cider
- 3/4 cups fresh lime juice
- 2-4 tablespoons agave nectar
Directions
Individual Cocktails
-
In a shallow bowl, mix equal parts, cinnamon sugar and salt. Run a lime wedge around the rim of your glass and coat in salted cinnamon sugar.
-
Combine the mezcal, apple cider, lime juice and agave in a cocktail shaker and fill with ice. Shake until combined and then strain into your prepared glass. Garnish with apple slices and cinnamon sticks.
~~~
Big Batch Margaritas
Combine the mezcal, apple cider, lime juice and agave in a pitcher and stir to combine. Keep chilled in the fridge. When ready to serve, coat the rims of 4 glasses in salted cinnamon sugar. Add ice to each glass and pour the margaritas over the ice. Garnish with apples and cinnamon sticks.
There you have it – all the tools you need to succeed on the greatest eating holiday of the year! Happy Thanksgiving!